Brand new fly tier

ryguyfi

ryguyfi

Active member
Joined
Oct 18, 2006
Messages
4,796
OK where do i begin. I have tied about a dozen flies so far and some are ok and some aren't. lol. Where do i begin. The one thing i'm not sure about is a whip finish. I see everyone talk about it but am not too sure how to go about doing it. Next is the dubbing. I read to twist it onto the thread and then apply, which has helped but i just can't get it tight enough, it looks too sloppy. But i'm sure that just comes with practice. One other thing. I usually start off by tying a cinch knot at the eye to start and just wrapping my thread towards where I tie in my first piece, usually the tail. But if i start off in the middle like some other people said, How do you get the thread from not moving? I have figured out that its all about how you layer the fly to see how it looks, but i have problems when you have to, lets say, tie in wings in among the hackle for a dry. Then also having, dont know what they're called, but some pieces of feather on the bottom of the fly. Just seems like alot to be tied in all at one spot. Well anyways.... i'm sure i'll have alot more questions later but here's the start. Thanks everyone. This has been an EXCELLENT site for me as a beginner to fly fishing.
 
edit: double post. sorry guys
 
http://youtube.com/watch?v=9muFk_z4yMo That's for the whip finish.

As a matter of fact, youtube and google video are great resources for those tricky things that you just want to see done, as opposed to reading.

I revolutionized my tying by getting the orvis fly tying manual.. http://tinyurl.com/y9vpzx (amazon.com) That's just the book I got, but I'm sure others will suggest many many more. I struggled with it until I got a decent book.

For dubbing, make a dubbing loop with a dubbing loop tool (its like a double 'v' shaped paperclip). Just lay the dubbing sparsely onto the loop and give er a spin. as it spins, work it in tighter and tighter with your fingers. This results in a tightly dubbed, yet buggy look.... good for nymphs. Dubbing wax also helps, and remember... use the least amount possible.
 
Starting your thread does not require a knot. It is difficult to explain in words and very simple to understand visually, so see if you can find a demo on line somewhere. Basically, you are winding the thread back over itself a short distance and then removing the excess or just covering it all up.

As for dubbing, no offense to jay, but at your stage of tying, I would forget about a dubbing loop. Most likely, you are using too much dubbing. All you really need to do is paint the thread. I take a pinch of dubbing about half the size of a pea and holding the thread upward or downward at a right-angle to the hook shank with about 2-3 inches of thread betweeen the tip of the bobbin and the hook, place the pinch around the thread about 1 inch from the hook and turn IN ONLY ONE DIRECTION as you slide your fingers toward the hook, spreading the dubbing evenly over the inch or so of thread. If it seems too thick, pluck some away and re-spin/spread the dubbing to even it out. As indicated by my shouting, above, turning the dubbing in only one direction is key.

Dubbing loops have their place, don't get me wrong, but I don't think they are a way to avoid a perceived problem with simple body dubbing.

Keep in mind, however, that I have no idea what I am talking about.
 
Now that I have more time, let me try to clarify:

Regarding dubbing--

The instructions in the prior post would apply to course dubbing such as hares ear. For finer or synthetic, when you pluck it from the dispenser, it will usually come out as a strand-like bunch, rather than a "pinch" as I described. In this instance, you would lay the strand along a section of thread extending perpendicular to the hook shaft (either above or below) and spin it in one direction only, moving your fingers from one end to another, smoothing it fairly evenly over an inch or so of thread up to the hook. Spin it tight and even. It should look like a thicker strand of thread. Then just wind it onto the hook.

Regarding thread starting and a basic procedure for a generic nymph or dry --

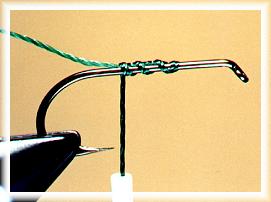
Assuming you are right-handed. The hook bend is to the left, the eye to the right; take the end of the thread in between your left index finger and thumb; move the bobbin over top and behind the hook shaft near the eye so the thread from your left hand goes up over the top of the shaft and down the backside to the bobbin; the distance from the end of the string to the hook shaft is about an inch; now bring the bobbin under the hook, winding clockwise (as if you are look down the shaft from eye to bend), holding the thread in your left hand out to the left, so that the clockwise winding traps the thread leading to your left hand against the hook shaft. Once you have taken 5-6 wraps, the thread should be secured and you can cut away the excess or just wrap down toward the bend until the inch of thread is completely covered under. In either case, continue wrapping the thread to the hook bend.

Once you have this thread base, you can wind the thread to the point next needed. I usually tie in the tailing material at this point, a short distance up from the beginning of the bend, then wind back to the bend to secure. Next, for a simple nymph, for instance, if you need a ribbing, tie it in near the tail, then push it back out of the way to the left and dub the thread winding forward to build the abdomen, stopping where the thorax should begin. If using ribbing, wind it up to the same point, then secure it. If the thorax calls for different material, tie it in and then wind forward toward the eye; if you want a wingcase, tie it in before dubbing for the thorax and leave it above and behind as you wind the thorax dubbing forward; tie in your legging or "beard", then pull the wingcase over the thorax and secure and build the head.

For a dry, most times, it is easier to tie in the wing (not the hackle) before building the abdomen. After the tailing is secure, wind forward, tie in the wing, then wind back, dub and wind the abdomen forward to the wing. Then secure the hackle behind the wing, wrap once or twice behind and three or four time in front of the winging, then build the head and whip it.
 
Good point jack, no offense taken.

I should have thought about it a bit.... after my first dozen flies, i wasn't ready for a loop yet... I guess I was trying to uncover one of those techniques that I had to find for myself, which has helped my tying.

I still stand by my statement that dubbing wax is your friend. :)
 
Here is a borrowed image that shows the thread starting method:
5threadstart.jpg


I borrowed this from flyanglersonline. This is a terrific site for beginning fly tying.

Start here http://www.flyanglersonline.com/flytying/beginners/ and consider working through the lessons one-by-one. Also, explore around the site. There are small videos and step-by-step tutorials as well as information on what flies to use when, etc. Very comprehensive.
 
First let me say, you've gotten some great advice so far. Let me add a couple sense worth.


"The one thing i'm not sure about is a whip finish. I see everyone talk about it but am not too sure how to go about doing it. "

Here is a link to a page with animations of starting the thread and of completing a whip finish.


"Next is the dubbing. I read to twist it onto the thread and then apply, which has helped but i just can't get it tight enough, it looks too sloppy. But i'm sure that just comes with practice. "

Jack's advice is excellent. In addition to what he says, I would add the words THREAD TENSION. You need to wind the dubbing onto the thread tightly, as Jack says. But, as you wind the thread on the hook, the thread should be wound at very close to the breaking point. You can't wind without gaps unless the thread is wound very tightly. It will also ensure that the dubbing does not unwind and will lay smooth.


"I have figured out that its all about how you layer the fly to see how it looks, but i have problems when you have to, lets say, tie in wings in among the hackle for a dry."

If you've realized that layering components is vital to a smooth appearance of the final fly, you're flying along. That's a vital observation.

To make wings and tails etc. lay in without bumps tie in the material without clipping it. Hold the butts up, and then clip in on an angle. Here's a link to what I am talking about. Look at Tip #1
http://www.midcurrent.com/articles/flies/beatty_tyingtips.aspx


"This has been an EXCELLENT site for me as a beginner to fly fishing."

It's purpose is to share tips and knowledge. So thank you for your questions. Your questions are why we keep coming here. So ask away!
 
If you are actually tying now, you should keep doing so until you can find someone to teach you in person how to whip finish. Some times when i'm just being lazy or if i'm just tying buggers, I'll just throw a couple of half hitches on the head and cement it. The trick to gettting the half hitch to stay is to grab the thread and give it a turn in the oppsite direction you originally wrapped it. If it gets loosens when you do this, do it over. If it tightens and crawls up under a previous wrap it'll stay and not come undone if you use a decent head cement.
 
Here's another link to some good videos of how to whip finish a fly....

http://flyfisherman.com/ftb/jbwhip/
 
Ryguyfi - great advise from everyone. The third video from Heritage Angler’s post shows how to use a Matarelli whip finisher. I’d recommend that you purchase one. I’ve found this tool to be one of the most useful tools on my tying bench. It makes an easy and neat whip finish every time. It enables you to whip finish on small flies, and in tight places like behind the bead on a bead head fly. One tip that I can share, is that I use dubbing wax on the last inch or two of the thread and whip finish using 3 turns, and then another 4 turns to finish. The wax makes the thread slide easily when pulling the thread tight, and helps hold the head together. I usually don’t even use head cement when I use the whip finisher. Using head cement is messy and inevitability ends up blocking up the hook eye. I can’t remember the last time I had the head of a fly come undone.

Good luck with your tying. Don’t expect museum quality flies from your first efforts. As you practice, and get the techniques down, the appearance of your flies will improve. Just remember that most fisherman demand perfectly tied flies…..but the fish don’t. Good Luck.
 
here is a another site for your reference. It helped me out whne i first started tying and still does

http://www.tie1on.net
 
Check with your local fly shop they usually have classes in fly tying especially this time of the year. To start a fly you hold the tag end of the thread and start about a third of the ditance down from the eye of the hook wrapping toward the eye. Then go back over the thread you wrapped to the tail. This is your base and allows you to start tying material on from the tail forward. Usually the last thing tied in is the hackle so you will never be tying the wings over the hackle. Hope this helps, feel free to PM me if you have any questions.
 
This is something I do when I want to dub very tight bodies on small flies, and it may help you with making your dubbing tighter. As many others said, use a small amount of dubbing. When you think you have a small amount, use even less! (Unless you WANT the fly to be kind of bushy.) After twisting the dubbing onto the thread in a thin line (in one direction, as Jack said), when you start to wrap the thread and the dubbing has been trapped against the hook, wrap it with your thumb and forefinger about a quarter to a half inch from the hook shaft and twist/stretch the dubbing a little bit as you wrap it around the hook. After every wrap you have to slide your fingers a bit further down the thread. More tension will make it tighter, less will make it looser. I normally don’t do this for an average fly, but it may help you if you try it to various degrees.

Tacky-wax might help too, but I don’t bother with it much anymore. I tend to lightly dampen my fingertips before twisting the dubbing onto the thread, and this might help. You can use a damp sponge (I often use my tongue, like a quarterback, but this probably isn’t very hygienic or healthy, especially with natural fur, and I’m careful to avoid doing it then). I have never seen any advice to do this, but it helps me get a tight twist of material on the thread.
 
All the help is greatly appreciated guys. I think i'm actually getting better. Always learning.... I think my dubbing is alot better. I've been trying to use less and it has helped me to pull the opposite end of the dubbing to put some tension on it also as i wrap with my thread. Tied a bugger the other day, and my wife(not the she's an expert by any means) said, "that's your best one yet" so i guess that's promising. One thing i'm still having trouble with is the whip finish. I kind of have the general idea down but what i'm having trouble with is my hackle. When i tie the final knot i'm getting my hackle all tied up in it. Is that a cause of tying everything too close to the eye, (which I have tried to fix that problem) or is there an easier way of doing it?
 
I'm not sure I understand what your problem is with the hackle, but I'll take a stab at answering. When you get done wrapping the hackle, make a couple of thread wraps around it at least a hook eye width back from the eye, then clip the excess off close to the thread wraps, then make some more thread wraps over where it was cut to cover it up so you just have a smooth thread section. I know what you mean about crowding the eye. That's something that I always have to try to avoid for some reason. Make sure you don't get any head cement on the eye. It's a real pain when you can't get your tippet through it when you're on the stream.
 
let me try to explain... stole this pic from the swap... see how the hackle is by the eye (like most of my dries), when i tie the whip finish i get all that hackle tangled up in my knot, or if i just tie some hitch knots (when i can't whip it cause i'm still not that good at it). I usually get my bodkin out and try to pick it out of the knot before it tighten it, but prob need 3 hands for that. I'm sure i'll get it eventually but any help will do.
 
Here are some suggestions:

1. try not to crowd the eye;
2. before whipping or hitching the head, stoke the hackle back away from the eye, it will fluff back shortly;
3. I used to have a small sheet of thin cardboard with a small hole bored into the center and a slit going out to the edge, you can slip it over the thread and then used it as a "shield" to push back the hackle, then whip in front of it (I don't do this anymore as it is too much trouble and i've got better at finishing the hackle far enough back not to bother);
4. As a last, but simple, measure, don't worry about trapping some of the hackle under the whip wraps, just trim them away with your scissors when you are done.

In case that device mentioned in #3 isn't clear, I drew a quick sketch below.
 
I second Jack's Hackle shield. I have never used one but it sounds like it would solve you problems. All fly shops should carry them, most are inexpensive and come in a pack of 3 didferent sizes. If you are frustrated and can't correct your problem, it may be worth the 5 bucks to end your frustration.

P.S. Nice drawings Jack.
 
Back
Top