mike_richardson
Active member
- Joined
- Mar 29, 2010
- Messages
- 1,564
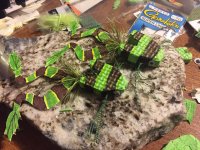
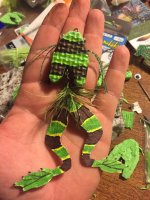
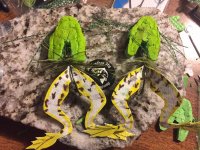
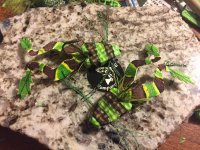
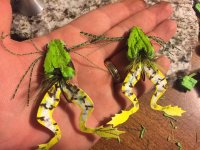
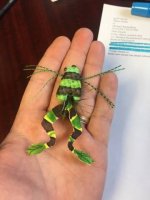
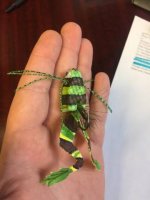
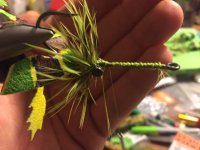
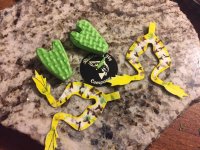
I got my materials last night and decided on tying up my own bull frog imitations.
I used the Cohen frog legs, and did some artwork on them, and decided on trying a big bull frog first. I also decided to use the body on a shank. I tied in dumbbell eyes and hope it will ensure that the frog rides hook point up at all times. I have yet to try and mono-weed guard but it is on the list. Hoping to get away with the weight.
ON the big bull frog, I wanted the legs to kind of suspend down ward when it is sitting idle. I believe it should do this. I picked up some extra large sowing needles and the make for nice leg pullers.
The bodies on these are the "Foam kneeling pads" I picked up from Dollar general.
The hackle is some chartrues green schlappen.
I love how these turned out and are a blast to tie. Not that hard of a tie, but very time consuming. I don't think you really need to go into that much detail on them, but I really enjoy trying to recreate nature as close as I can. They eyes aren't realistic but I wanted them because they should help make some added noise.
Thanks for the look.
If any one wants a tutorial on these I will gladly put one up as I am going to make a few more for my bass and musky box.
I am getting a 10wt custom made for me, and will be running an Allen Kracken reel in the dorado colors on it. I am not a flashy guy but the rod builder is out of this world and does it as a hobby. So he told me he will hook me up. I was just expecting the eye wraps to match but he told me he is going to do some of the crazy designs you see down by the handle. This will be my musky rod, and I will also be looking for an 8 wt for bass.
I am really glad I got into warm water tying as it really sparked my love for tying flies again.
Attachments
-
 bullfrog.jpg116.2 KB · Views: 6
 -
 bullfrog 1.jpg93.4 KB · Views: 3
 -
 bullfrog 2.jpg122.4 KB · Views: 2
 -
 small bull frog 1.jpg116.8 KB · Views: 2
 -
 small bull frog 2.jpg92.1 KB · Views: 3
 -
 small bull frog hand.jpg18.5 KB · Views: 4
 -
 small bull frog hand1.jpg17.7 KB · Views: 3
 -
 leg-weight reference.jpg61.1 KB · Views: 4
 -
 body and legs.jpg111.2 KB · Views: 5


