DIY kayak/canoe loading aid

wgmiller

wgmiller

Well-known member
Joined
Aug 24, 2008
Messages
2,847
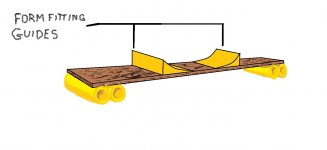
I have a small car and I've been wrestling with how best to load my kayak on my car. I've been laying down blankets to run the kayak up the back trunk lid and onto the roof rack cradle, but my car has still been getting some slight damage.

While I'm not a big fan of cross-linking forums, I came across this idea while conducting some internet research that I think would really help out when it comes to loading a kayak/canoe onto a vehicle and not just a car. For those of us without pickups, we know what a challenge it can be at times to wrestle a watercraft on top of a car!

I ordered up a suction unit from Northern Tool and hope to have one cranked out by the end of the week. Hopefully my car will be thanking me!
 
I actually never had a problem loading my kayak onto my car. I just lifted it up and put it on the car from the side. I used two pieces of soft foam packing, about 18"x 12"x 4" on the roof to rest the kayak on. After that I just strapped it down through the windows with ratcheting straps so it was nice and snug.

To make things better my Subaru doors were frameless around the windows so I could strap it down with the doors closed. It also conveniently had Oh Sh*t handles for each passenger so I could just hook the strap into the handles instead of all the way through the car from one side to the other.

I have an SUV now and while having a rack is nice I actually have more trouble with it because of it's height. I have an enormous canoe and I typically have to load/unload it by myself. For that I lay two planks across the rack and slide it up from the back.

Back when I had to put the canoe on the car I had two planks of wood with a large square of foam on each end of each board, with the foam side facing down to protect the car. They were something like 6 ft. x 12" x 1" boards with a 12" x 12" x 4" square piece of foam on each end. To fasten the foam to the wood (I had no washers so I drilled holes in pennies), I screwed them in place with short screws using the pennies as washers otherwise the screws would just tear through the foam. The bigger the washers the better, as they hold the foam to the wood I just stuck the washer on the screw and compressed the foam to where the screw touched the wood then screwed it in. The short screws are so they don't penetrate through the other side of the wood. Also with the foam side down the screw and washer never scratch the car because it is into the foam if you can picture it, I wish I had a picture to show you it's pretty simple.

I'd just lay one across the roof behind the front windshield and the other across the roof near the rear window and the canoe, (or kayak) goes on top.
 
Ok so I drew you a picture, from there just remember screw the foam (with large washers) to the wood using one screw and washer per foam block, placing the screw dead center. A 1 1/2" screw should work if the foam is soft enough to compress.

The hard part is finding the foam.

You can place these anywhere on your car to assist loading it and for your kayak to rest on during transport without scratching your car. Two of them was all I ever needed.

Take a look, purty darn simple.
 

Attachments

  • Canoe keeper for car.jpg
    Canoe keeper for car.jpg
    78.4 KB · Views: 6
Here is a pic of them on a car. :hammer: :hammer: :pint: :pint: :hammer: :pint: :pint:

Strapping the kayak down with ratcheting straps through the windows of the car (preferably a 4 door but anyway) and tightening with the ratchets compresses the foam against the car for a snug secure transport.


You might be a redneck if...................................
 

Attachments

  • Awesome car diagram featuring canoes keepers.jpg
    Awesome car diagram featuring canoes keepers.jpg
    75.7 KB · Views: 3
more picture please, these are awesome!
 
It appears you're driving an 1986 Lincoln Town Car with a sweet chop job on the roofline. Actually, wait, did do suicide doors on inspiration from the '64 Continental, too. That's a killer look.

That's a sweet merlot paintjob, too.

I'd suggest some pinstriping and maybe accent colours, I imagine that while gold is played out, you could really do somthing with a metal flake purple or kelly green.

On subject: Thule or Yakima makes a pretty nifty loader that'll drop the system off the side of the car so you don't have to hoist it as far up. Of course, that comes with the price tag associated with those makers.
 
What, no comments on the bullhorns and the smiley face antenna ?
 
I apprechiate fine crafting that goes into chopping your Town Car and giving it the suicide doors, but the horns and antenna topper are just crass, sir.

I also suggest you replace your rear bumper, it appears you've backed into something.
 
Well then sir, I've fashioned a new car for you this morning......................introducing the Stretch IROC-Z with rear suicide doors.

Oh, and slightly chopped.
 

Attachments

  • PAFF Stretch IROC-Z.jpg
    PAFF Stretch IROC-Z.jpg
    170.8 KB · Views: 3
An IROC-Z?

C'mon, what sort of mullethead do you take me for.

I would accept a ratted out Type 1, Pristine Type 181, or an El Camino in that awesome '70s green with red flames.

And I've already got a car with suicide doors and gun slit windows.
 
This kind of mullet head ?

lol. I am having fun with drawing but this is getting off topic I suppose.

I almost bought an apple El Camino with a 454 in high school. Got the Blue IROC-Z though.
 

Attachments

  • Mullet head Hetfield.jpg
    Mullet head Hetfield.jpg
    5.4 KB · Views: 3
  • Binge & Purge.jpg
    Binge & Purge.jpg
    78.3 KB · Views: 4
I suppose if you cannot find large enough pieces of soft packing foam you could buy the largest sponge available for washing your car. You know, them real big ones at the auto parts stores.

Mine came from huge Motorola boxes containing the computer systems that go into the PA State Police interceptors. Nice big pieces of soft foam. I'll have to see if they've got any new MO 3's up there, might be able to get some more of that foam if I ask.
 
Fun Noodles at a pool store?
 
Just add some wood finish for durability and you have the bling-blingiest roof rack system around.

Not onlt that but it works on every vehicle for kayaks or canoes.

You just have to know how to strap the vessel down properly and tightly.

This is the view of what the bottom should idealy look like. Note that the screws appear to be recessed a few inches into the foam holding it in place with large diameter washers.

At the same time they are not not going damage your paint job because they are adequately recessed and out of the way.

This is exactly the way my rack looked, I had it about 8-9 years, would have lasted longer if I had used wood finish.
 

Attachments

  • Screws recessed into foam diagram.jpg
    Screws recessed into foam diagram.jpg
    110.2 KB · Views: 6
I suppose with some thought it would work. ;-)

Here we go, two lengths of fun doodles, each doodle secured with two screws and two washers on the inside, either slide washers in through ends or drill 1 inch hole to fit them inside.

If you can slide the washers in you can get away with only having puncture holes in the outside of the doodle from the screws going through.

I now have a dedicated folder for "Paflyfish diagrams and sketches".
 

Attachments

  • Two doodles.jpg
    Two doodles.jpg
    167.1 KB · Views: 3
From there you can get pretty creative, you could attach custom fitting guides to fit your kayak. The guides or bolsters could be made from wood or foam or whatever.

They would help in guiding it up, and to cradle it during transport keeping it snug. Even if you already have a permanant rack something like this should stay put on your rear winshield so you could guide the kayak up.

They typically worked well for me sliding a large canoe onto my car for many years and did not move around too much.

I hope I have been helpful
 

Attachments

  • Custom fitted roof rack.jpg
    Custom fitted roof rack.jpg
    78.7 KB · Views: 2
I think Jake has an El Camino somewhere in the garage!
 
Jake,

You are a hell of a paint artist.
 
Thanks for the comment, I am currently working on this, however it is in the beginning stages.

You can see I haven't started on the right side of the creek yet or the background and scenery. MS Paint is pretty cool, you can customize colors.
 

Attachments

  • Meadow Stream.jpg
    Meadow Stream.jpg
    116.7 KB · Views: 6
Back
Top